| M-1911 Disassemly |
Disassembling the M-1911 type of pistols is a straight forward and simple process. It requires a minimum of tools (actually before Colt's Series 80 pistols, it was possible to completely disassemble and re-assemble the pistol without ANY tools), like a pair of tweezers, a punch, etc, althought you can improvise!
Before starting to take the pistols apart, follow one simple safety rule. Make sure the gun is empty. Remove the magazine and pull the slide back and lock it in the open position. Check that the barrel's chamber is empty. Always think safety first.

Before you proceed any further, please remember that at some time, you will have to reassemble the pistol. So please, for your own sanity, before you start taking things apart, study how things look when the gun is still intact. You might also want to read some Reassembling Notes, I 've put together. OK, here we go!
Taking it apart
Remove the recoil spring plug and the recoil spring. Cock the pistol's hammer to the full-cock position (NEVER EVER cock the hammer to the half-cock position. It is an unsafe condition and should be avoided at all cost). Now pull the slide to the rear, until the slide release lever end is aligned with the small circular notch, on the left side of the slide.
Push the axis of the slide release lever from the right side of the gun, towards the left side. The slide release lever will pop out. Pull it completely off the frame of the gun.
Facing the muzzle of the barrel again, twist the barrel bushing anticlockwise and pull it out. Move the barrel link forward towards the muzzle and remove the barrel from the front opening of the slide.
This completes the every-day field stripping procedure. It is normally not recommended to proceed any further, unless you are sure of what you are doing, in which case you wouldn't be reading this anyway, but let's go on.
This completes the stripping of the slide.
You are now ready to continue. Grasp the hammer with the fingers of your left hand and release the trigger, while holding the hammer. Do not simply release the trigger, allowing the hammer to fall forward. This practice can destroy your gun.
Finally, find a screwdriver, which exactly matches the slots of the stock screws on your gun and unscrew the four stock screws. It is important that the screwdriver is of the proper size, as if it is not, it might slip and you could end up with scratched screws. Sometimes, when you remove the stock screws, a stock screw burshing might get unscrewed, instead of the screw. In that case, get a pair of plyers, hold the bushing with them tight and unscrew the stock screw from the bushing.
That completes the disassembly of the pistol. The ejector and the plunger tube should not be normally removed from the frame. If you do want them removed, use a small punch to push out the corresponding pin, which holds them in place. The pin is located in the slide rails, right under the ejector. Push it out and then lift the ejector. Now the plunger tube can be removed.
If you want to disassemble an M-1911 magazine, insert three or four rounds in the magazine. Then insert a pin (possibly the hammer strut) thru one of the magazine hole's, below the follower, in order to keep the mag spring down. Remove the rounds from the magazine and turn the mag upside down and shake it until the follower falls off. Remove the pin that holds the spring in and remove it.
Not difficult, was it?
Reassembling
Reversing the above procedure, you can put the gun together. There are however, some points that should be noted :
- The relative position of the sear, disconnector and if you have a Series 80 Pistol, the Firing Pin Safety Sear Lever. The following pictures can be of help.
Here are some close-ups of how the sear, disconnector and trigger should be when reassembling the pistol.
And here is how the sear spring should be inserted.
- In order to put the Safety Lock back in, you should use a small pin, to push the Safety Lock Plunger in the Plunger tube. Push the Plunger in, while in the same time you twist and push the Safety Lock inwards. Remember that the hammer should be cocked for the Safety lock to be inserted.
- When inserting the Slide Stop, make sure that it engages the Barrrel Link hole. To be sure, after you insert the slide stop, try to move the slide forward. It should not get more forward than it normally does.
Several people have written, asking how to insert the slide stop without scratching the frame or the slide. Let me say that no M-1911 owner I know, has managed that the first time he reassembled his pistol, so do not feel bad if your pride and joy has a circular scratch below the slide stop opening on the frame (this can be avoided easily) or worst, on the slide, right above the slide stop cut (more difficult to avoid, but not impossible). Here are some close-up shots, showing you how to do this.
Start with the slide cut aligned with the frame opening and with the slide stop in this position. Gently press inwards and upwards. The trick here is to push the slide stop so that the plunger does not get into the slide stop slot, but below it, so that it gets to the flat part of the flat slide stop face.
Here you see the plunger as it starts climbing to the flat slide stop face. Keep pushing inwards and upwards.
Here you can see that the slide stop has entered the frame and the slide cut, and is almost fully into its final position.
I've came up with the following two video clips, trying to better show you, how to insert the slide stop, without scratching your pistol.
- If you have taken the mainspring housing apart, be careful when putting it back together, as the mainspring needs considerable pressure, in order to be inserted in the housing, while in the same time you must put the pin back in.
Finally, thanks to Sterling Roth, a member of our Forums Site you may check out this animation, which shows you in a step-by-step fashion, how to disassemble and reassemble your M1911.
Please select the file you want to download.
Disassembly - Hi-Resolution version (23 MB)
 After making sure that the pistol is empty, release the slide manually and let it slide slowly forward. You can release the slide, using the slide release lever, but some authorities recommend against doing it with an empty gun. With the slide forward, and facing the muzzle of the pistol, press the recoil spring plug inwards until the barrel bushing is free to be twisted clockwise, until it uncovers completely the recoil spring plug. BE CAREFUL, the recoil spring plug is under pressure from the recoil spring, so if you do not keep it pressed when twisting the bushing, it can fly away (I learned that the hard way!).
Note: The above instructions apply to the standard pistol. If you have replaced the guide rod, with a full-length one, you obviously have to follow different instructions, those supplied with your guide rod.

 Hold the gun upside down and push the slide forward and remove it from the frame. You can remove the recoil spring guide now.


 We shall continue, by removing whatever is left on the slide. If your gun has a Colt Series 80 safety, push the Firing Pin Lock Plunger up and using a punch push the Firing pin inwards. Release the Firing Pin Lock Plunger so that it keeps the Firing Pin inside its opening. If your gun does not have a Firing Pin Locking mechanism, simply push the firing pin inside its opening, using a punch (or other pointing tool).
 Using the punch, pull down the Firing Pin Stop and remove it. Cover the Firing Pin opening with your thumb, and press the Firing Pin Lock Plunger again, to release the Firing Pin. This action will allow the Firing Pin to move back against the pressure of the Firing Pin Spring. Remove the Firing Pin together with its Spring. Pushing the Firing Pin Lock Plunger inwards, pull the extractor slightly backwards. You must pull it enough, so that the Firing Pin Lock Plunger can be freely removed from the bottom of the slide.
 Remove it and then remove the extractor completely.
 Some people suggest, as the next step to remove the thumb safety. The reason being, that a jam can occur, if you remove the mainspring housing first. However, I prefer to remove the mainspring housing first, but if you do it my way, you must keep the grip safety pressed all the time, until the thumb safety is removed. To remove the mainspring housing, use a punch and a hammer (or any relatively heavy object you can find, like a shoe) and punch the Mainspring Housing Pin out, towards the right side of the pistol. Be careful not to punch to forcefully and have the pin fly to the next room. The removal of the pin will be helped if you exercise a slight pressure at the bottom of the Mainspring Housing, towards the upper of the gun.
 After removing the Mainspring Housing Pin, pull the Mainspring Housing down and remove it from the frame, while holding the grip safety pressed, at the same time. I would not suggest that you disassemble the Mainspring Housing.
 However, if you do want to do it, use a thin puch to push the Mainspring Cap Pin out, by pushing it from the outside of the Mainspring Housing to the inner side. BE EXTREMELY CAREFUL, as the mainspring is under considerable tension and it can fly away, hitting you on the face.
 After removing the pin, you can remove the Mainspring, its cap and the Mainspring Retainer.
 While still holding the grip safety pressed, cock the hammer again and move the Safety Lock upwards, while in the same time pulling it out of the frame. NOTE that the Safety Lock cannot be removed with the hammer uncocked.
 When you remove the Safety Lock, the Grip safety can also be removed.
 You may now remove the 3-prong Sear Spring at the rear of the grip. To do that lift the hammer strut first.
 Push the Hammer Pin from the right side of the gun, towards the left. This will allow you to remove the hammer. Simply push the pin out, do not punch it. BE CAREFUL as the removal of the Hammer Pin, will also allow the removal of the Upper Sear Lever (if your gun is a Series 80 one), so make sure you don't drop it and loose it.

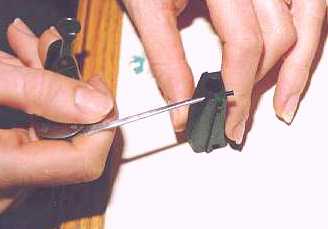
 Before proceeding any further, take some time to familiarize yourself with the arrangement of the Lower Sear Lever and the Upper Sear Lever, which form the Colt Series 80 firing pin safety mechanism (if, of course your gun is so equipped). You may now remove the Sear Pin. Slowly push it out from the right side of the frame to the left.
 When removed, the Lower Sear Lever (for Series 80 guns), the Sear and the Disconnector can be removed. Turn the pistol upside down and let the parts drop into your palm.
 Using one of the prongs of the Sear Spring you can remove the Magazine Catch Assembly. To do so, push the Mag Catch Assembly in, as if you were releasing a magazine. While holding the Mag Catch Assembly in that position, turn the small screw on the right side of the Mag Catch Assembly about 90 degrees counterclockwise. You will immediately feel that the spring tension has been removed. Now push the Assembly to the right side of the gun and remove it.
 Push the Trigger to the rear and remove it from the rear of the gun.
 Slowly pull the Safety Lock Plunger, the Plunger Spring and the Slide Release Plunger off the Plunger tube.