A well fit extractor is essential to the reliability of any M-1911 pistol. The following guidelines apply to fitting a new extractor, or properly tuning the one you have in your gun.
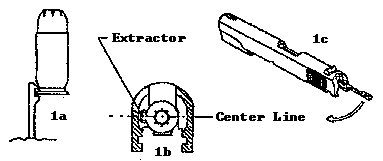
For tension adjustment, place aprox. 1/2" of the tip of the extractor into the extractor channel and apply just enough pressure to slightly bend the extractor. Be careful, a little goes a long way! See figure 1c.
Do not put more tension than needed to perform this simple test - too much tension will result in feeding malfunctions whereas too little tension can cause failure to extract and/or erratic ejection.
Slide the rim of an EMPTY case under the extractor hook and position the case so that the extractor hook grips it at the center line. Now pull the case downwards approx. .075 - .1000"; there should still be tension, enough to keep the empty case in position even when the slide is lightly shaken. The same test performed with a loaded round should result in the cartridge falling off. This equals roughly to 1-1.5 lbs tension on the case.
If you have correct tension on the case when it is centered on the breechface, as described in (1) above and little to no tension at all, with the case being pulled down approx. .075 - .100", you need to bring the extractor groove closer to the firing pin hole.
This is done by removing a small amount of material at a time, from the locator pad, while maintaining the radius. Constantly check for correct tension, so that you don't take too much material off. See sketch below.

With the extractor installed, the firing pin stop should slide into position using normal finger pressure. If the firing stop binds (when installing a new extractor), you will have to reducve the width of the firing pin stop, by removing material from its right side, where it contacts the extractor.
Remove only a few thousandths of an inch at a time, while being careful to keep the right side parallel to the left side. When correctly installed, the firing pin stop will fit snugly into place, which prevents the extractor from twisting.

Finally, several extractors sold, come rough and not polished or prepared. The following drawing shows you where you have to tune your extractor hook.

Click here to visit Wilson Combat Web site.
